change page title using jquery

In this tutorial you will learn how to change the page title using jquery. I will not recommend you to do so because it is not good for seo aspect of website. But one of my friend ask me to write tutorial so i am writing this. It's not a big rocket science. It is actually a one line code. Let's have a look over how to do so.

change page title using jquery

<script type="text/javascript">
      $(document).ready(function() {
        document.title = 'new page title using jquery';
      });
    </script> 

I hope you will find this article very helpful.

Happy Coding!!!
Read more...

format currency using jquery plugin

In this tutorial you will learn how to format currency using jquery plugin jQuery Format Currency plugin 1.4.0 . Using this plugin you can easily do what you want without any need to write code. Let's have a look over how to do so

format currency using jquery plugin

<script src="js/jquery-1.4.2.js" type="text/javascript"></script>
    <script src="js/jquery.formatCurrency-1.4.0.js" type="text/javascript"></script>
    <script language="javascript" type="text/javascript">
        $(document).ready(function () {
            $("#firstDiv").text("$44").formatCurrency();
            $("#secondDiv").text("$200").formatCurrency();
            $("#thirdDiv").text("$0.700").formatCurrency();
            $("#fourthDiv").text("$20000000").formatCurrency();
            $("#fifthDiv").text("$8000000000").formatCurrency();
        });
    </script>


Include jquery and jquery format currency plugin in your webpage.

Let's have a look over html code
<body>
    <div>
        <div id="firstDiv">
        </div>
        <div id="secondDiv">
        </div>
        <div id="thirdDiv">
        </div>
        <div id="fourthDiv">
        </div>
        <div id="fifthDiv">
        </div>
    </div>

</body>


Output will be
$44.00
$200.00
$0.70
$20,000,000.00
$8,000,000,000.00

I have also written a tutorial in javascript about Format the currency using javascript. I hope you will find this article very helpful.

Happy Coding!!!
Read more...

How to highlight the form fields using css and jquery

In this tutorial you will learn how to highlight the forms fields using css and jquery. Now a days it is special requirement to create better and user friendly GUI forms so that user can visit your website again and again. The purpose of this tutorial is to make your forms different to forms used in other websites for better user experienced. Now let’s have a look over how to highlight the form fields using css and jquery.

How to highlight the form fields using css and jquery


<style type="text/css">
         .setFocus
        {
            border: solid 2px #95ce61;
            background: #fff;
            color: #000;
        }
        .setIdle
        {
            background: #fff;
            color: #6F6F6F;
            border: solid 2px #DFDFDF;
        }
    </style>
<script language="javascript" type="text/javascript">
  $(document).ready(function () {
            $('input, textarea, select').addClass("setIdle");
            $('input, textarea, select').focus(function () {
                $(this).removeClass("setIdle").addClass("setFocus");
            });

            $('input, textarea, select').blur(function () {
                $(this).removeClass("setFocus").addClass("setIdle");
            });

            //Applying MSIE Check
            if ($.browser.msie) {
                $("select").bind("focusin", function () {
                    $(this).addClass("setFocus");
                });

                $("select").bind("focusout", function () {
                    $(this).removeClass("setFocus");
                });
            }

        });
</script> 

Now let's understand. We have declared two css classes setIdle and setFocus. The only discussable thing in both classes is margin property through which I am handling all the highlighting of form fields in onfocus event.


After this I have code written in jquery that will call these classes for form fields against desired events such as focus and blur. I am just assigning setFocus class for focus event of form elements and then calling setIdle class for blur event of form elements. Normally form fields/elements are categorized in three categories

  1. Input
  2. Textarea
  3. Select


To cover all these fields I have written following line of code
$('input, textarea, select').addClass("setIdle");


So this is the proper way to highlight form fields using jquery and css. Hope it will work for you.

Read more...

How to capture web page screenshot in asp.net using c#

In this tutorial you will learn how to capture webpage screenshot in asp.net using c#. You may got a requirement to capture the screenshot when user submits the form , etc. Most of the people purchase third party dll files and use them in their project to capture the screenshot of webpage. It is quite easy in asp.net and there is no need to purchase any dll. Let's have a look over how to do so.

How to capture web page screenshot in asp.net using c#

using System;
using System.Collections;
using System.Configuration;
using System.Data;
using System.Linq;
using System.Web;
using System.Web.Security;
using System.Web.UI;
using System.Web.UI.HtmlControls;
using System.Web.UI.WebControls;
using System.Web.UI.WebControls.WebParts;
using System.Xml.Linq;
using System.Collections.Generic;
using System.Web.Services;
using System.Text;
using System.Windows.Forms;//must be included for capturing screenshot

public partial class capture_webpage_screenshot : System.Web.UI.Page 
{
    protected void Page_Load(object sender, EventArgs e)
    {
       
    }
    protected void btnSave_Click(object sender, EventArgs e)
    {
        Bitmap bitmap = new Bitmap(Screen.PrimaryScreen.Bounds.Width, Screen.PrimaryScreen.Bounds.Height);
        Graphics graphics = Graphics.FromImage(bitmap as System.Drawing.Image);
        graphics.CopyFromScreen(25, 25, 25, 25, bitmap.Size);
        bitmap.Save(@"c:\screenshot\myscreenshot.bmp", ImageFormat.Bmp);
       
    }
}

The code is ready. Just you have to do the following steps.

  1. Right click the project name
  2. Add reference -> .net tab and then choose system.windows.forms namespace then press ok button.
  3. In .aspx code behind file you have to import the System.Windows.Forms namespace and that’s it.
By customizing parameters used in CopyFromScreen() function, you can figure out how to capture the small portion of the screen, if required. Create a folder and give folder path in c# code just like above i have given. You can customize the code as well and give the dynamic name of bitmap file every time it is generated.


Happy Coding!!!

Read more...

How to give inline css to any page element in c# code behind.

In this asp.net tutorial you will learn how to give inline css to any desired page element in c# code behind. Sometimes you may got requirement to give inline css when certain condition meets in your if/else condition or switch statement. In this tutorial I will let you you how to handle this situation.

How to give inline css to any page element in c# code behind.

.apsx

<asp:Label ID="lblName" runat="server"></asp:Label>


.aspx.cs

if (lblName.Text== "Muhammad Ali")
                {
                    lblName.Style.Add("color", "green");
                }
                else
                {
                    lblName.Style.Add("color", "red");
                }

The above lines of code segment are self explanatory. I am checking that if name is Muhammad Ali then asp:Label color will be green else color will be red. Simply I use built-in Add function of Style class to give inline css to asp:Label in c# code behind.


So that’s it. Hope it will work fine for you.

Read more...

How to check if system is 32-bit or 64-bit (x86 or x64)

In this tutorial we will learn how to check if system is 32 bit or 64 bit. Generally in this blog I cover only programming related tutorials but now I will also cover all the things that help you to improve programming skills. Many of the time you may have noticed that before downloading software such as WAMP, XAMP etc, it is required to tell the mode of system, if system is in 32 bit based operating system then you should download that particular software designed for 32 bit based system and if system is in 64 bit based operating system then you should download that particular software designed for 64 bit based system.

Difference between 32-bits and 64-bits versions of windows

The terms 32-bit and 64-bit refer to the way a computer's processor (CPU) handles all the information. The 64-bit version of Windows handles large amounts of random access memory (RAM) more effectively and efficiently than a 32-bit system.

How to check whether system is 32-bit or 64-bit(x86 or x64) in different versions of windows operating system

Windows Vista


Method 1


  1. Click Start -> Run or Start Search.
  2. Type msinfo32.exe, press Enter key.
  3. In "System Information", check the value for the System Type item:
  4. For 32-bit editions of Windows, the value of the System Type item will be x86-based PC.
  5. For 64-bit editions of Windows, the value of the System Type item will be x64-based PC.


Method 2


  1. Click Start, type system in the "Start Search" box and then click system in the "Programs" list.
  2. The operating system appears as follows:
  3. For a 64-bit version operating system: 64-bit Operating System appears against "System type" under "System".
  4. For a 32-bit version operating system: 32-bit Operating System appears against "System type" under "System".


Method 3


  1. Click Start, type system in the "Start Search" box and then click System Information in the "Programs" list.
  2. The operating system appears as follows:
  3. For a 64-bit version operating system: x64-based PC appears against "System type" under "Item".
  4. For a 32-bit version operating system: x86-based PC appears against "System type" under "Item".


Microsoft Windows XP Professional


Method 1


  1. Click Start then click on Run or Start Search.
  2. Type msinfo32.exe and then press Enter key.
  3. In "System Information", check the value for the System Type item:
  4. For 32-bit editions of Windows, the value of the System Type item will be x86-based PC.
  5. For 64-bit editions of Windows, the value of the System Type item will be x64-based PC.


Method 2


  1. Click Start, click Run, type sysdm.cpl, and click OK.
  2. Click the General tab. The operating system appears as follows:
  3. For a 64-bit version operating system: Microsoft Windows XP Professional x64 Edition Version appears under System.
  4. For a 32-bit version operating system: Microsoft Windows XP Professional Version appears under System.

Method 3

  1. Click Start -> Run, type winmsd.exe and then click OK.
  2. In the details pane, locate Processor under Item. Check the value.
  3. If the value that corresponds to Processor, starts with x86, the computer is running a 32-bit edition/version of the Windows operating system.
  4. If the value that corresponds to Processor starts with ia64 or AMD64, the computer is running a 64-bit edition/version of the Windows operating system.

Microsoft Windows Server 2003

Method 1

  1. Click Start-> Run, type sysdm.cpl and then click OK.
  2. Click the General tab. The operating system appears as follows:
  3. For a 64-bit version operating system: Microsoft Windows Server 2003 Enterprise x64 Edition appears under System.
  4. For a 32-bit version operating system: Microsoft Windows Server 2003 Enterprise Edition appears under System.

Method 2

  1. Click Start-> Run, type winmsd.exe and click OK.
  2. In the details pane locate Processor under Item. Check the value.
  3. If the value that corresponds to Processor, starts with x86, the computer is running a 32-bit edition/version of the Windows operating system.
  4. If the value that corresponds to Processor starts with EM64T or ia64, the computer is running a 64-bit edition/version of the Windows operating system.

Windows 7

  1. Open System by pressing the Start button.
  2. Right-clicking Computer and then clicking Properties.
  3. Under System , you can view the system type.
I hope you will find this article very helpful.
Read more...

Query to get data from another database server

In this tutorial we will learn how to get data from another database server. It is quite handy to remain sit on one database server and get data from another database server. Let's have a look over how to do so

Query to get the table data from another database server

select * from [database_server_name].[database_name].dbo.tbl_name

If the database name or database server name contains special characters such as -,_ then you have to put their name inside square brackets[]like i did above.

Note:- For getting data from one database server in another database server, both should be connected each other via link server.

I hope it will be great helpful for you.
Read more...

How to alter the data type of primary key in a table of ms sql server database

In this tutorial we will learn how to alter the data type of primary key in a table of ms sql server database. We should think widely when we create any table in database. We should think how much data can be stored in the columns of the table and in which format the data will be stored. Many people intentionally set the data type of primary key to int while on the same time they know very well that a time will come when data length will exceed the limitations of int and at that time they have to alter the primary key data type from int to bigint. This tutorial is for those people

Steps to alter the data type of column set as a primary key in a table of ms sql server database


Step 1:- Drop Constraint
ALTER TABLE student
DROP CONSTRAINT PK_student


Step 2:- Alter column data type
ALTER TABLE student
alter column student_id bigint NOT NULL


student_id column was prevously set as primary key and will become primary key again with alter data type


Step 3:- ADD CONSTRAINT
ALTER TABLE student
ADD CONSTRAINT PK_student PRIMARY KEY (student_id)


I hope it will be great helpful for you.

Read more...

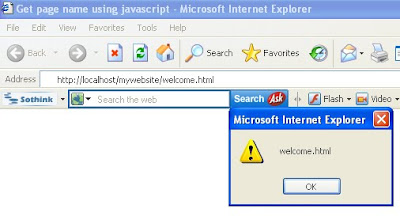
Get page name from url in javascript

In this tutorial you will learn how to get page name from url in javascript. I have already written a post that teaches same thing and in asp.net. I will recommend you to get page name from url by using client side language such as javascript. Try to write as less server side code as possible because if same thing can be achieved through client side language javascript then there is no need to write server side code and put burden on server. Now let's have a look over how to do so

Get page name from url in javascript.

<script language="javascript">
        var url = window.location.pathname;

        var myPageName = url.substring(url.lastIndexOf('/') + 1);    

        alert(myPageName);
</script>


So this is the way to get page name from url in javascript.


Happy Coding, Keep Coding.


Read more...

create div element dynamically by using javascript

In this tutorial you will learn how to create div element dynamically by using javascript. We will do this by utilizing the DOM features of javascript. Let's have a look over example given below


Create div element dynamically by using javascript

<html xmlns="http://www.w3.org/1999/xhtml">
<head>

<title>Create div element dynamically using javascript</title>

<style type="text/css">

.myDivClass
{
color: #999;

padding: 10px;

width: 250px;

height: 150px;

border: solid 1px #666;

}

</style>

<script type="text/javascript" language="javascript">

function CreateDivElement() {

var divElement = document.createElement("div");

divElement.id = "myDiv";

divElement.className = "myDivClass";

divElement.innerHTML = "Hello World!";
document.body.appendChild(divElement);

}

</script>

</head>

<body>

<div>

<input id="myBtn" type="button" value="Click Me" onclick="CreateDivElement();" />

</div>

</body>

</html>
And if you want to want to create div element inside any other html element of page body then nothing to worry. Let's suppose we have a div in our page which id is testDiv like given below
<div id="testDiv">
</div>
and you want to create div inside this testDiv. Just you have to change the last line of CreateDivElement() function from


document.body.appendChild(divElement);
to
document.getElementById('testDiv').appendChild(divElement);


and that's it. I hope you will like this tutorial.


Happy Coding, Keep Coding
Read more...