Get last created or modified file name in a directory in asp.net using c#

In this tutorial you will learn how to get the last created or modified file name in a directory in asp.net using c#. Almost a week ago I got a requirement to get the last created file name in a directory, I done it successfully and then decided to share with you nice people on nice-tutorials.blogspot.com :). Below is the code snippet that will do what you want.

Get last created or modified file name in a directory in asp.net using c#

Method 1)

string filePath = @"~\FolderName\";
string completeFilePath = Server.MapPath(filePath);
var directory = new DirectoryInfo(completeFilePath);
var fileName = (from f in directory.GetFiles()
orderby f.LastWriteTime descending
select f).First();
lblDisplayFileName.Text=fileName.ToString();


Method 2)

string filePath = @"~\FolderName\";
string completeFilePath = Server.MapPath(filePath);
var directory = new DirectoryInfo(completeFilePath);
var fileName = directory.GetFiles()
.OrderByDescending(f => f.LastWriteTime)
.First();


filePath variable contains the name of the folder from which you want to get the last created or modified file name. completeFilePath contains the exact physical path of folder on the server, returned by Server.MapPath() function because it is not good approach to hard-code the physical file paths such as D:\MyWebsite\FolderName into your web application, the path of file can be changed if you want to move your application into production. OK. And then using LINQ query syntax I get the last created or modified file name. In my case, folder is placed on root so that's why I used ~\ .

Note:- Don't forget to include the System.Linq, System.Xml.Linq and  System.IO namespaces


So that's it, you got the name of most recent file in a directory. Lot of cheers!!!
Read more...

Error during serialization or deserialization using the JSON JavaScriptSerializer. The length of the string exceeds the value set on the maxJsonLength property

In this asp.net tutorial you will find the solution of this nasty error, Error during serialization or deserialization using the JSON JavaScriptSerializer. The length of the string exceeds the value set on the maxJsonLength property. This error comes when you want to get huge amount of data through JSON format in your asp.net page. The only thing that you have to do is to add following code snippet in the web.config file of your project between <configuration> and </configuration> tag

<system.web.extensions>
<scripting>
<webServices>
<jsonSerialization maxJsonLength="50000000"/>
</webServices>
</scripting>
</system.web.extensions>


I have set maximum value to MaxJsonLength property according to current situation. As per documented by Microsoft, MaxJsonLength Property gets or sets the maximum length of JSON strings that are accepted by the JavaScriptSerializer class.The MaxJsonLength property cannot be unlimited, it is an integer property that has by default 2097152 characters (approximately. 4MB of data). But my suggestion for you is to don't show such huge amount of data at once in front of user because it might be hang his browser, please use pagination for better performance and consistency. I will write some posts about pagination in asp.net and pagination in asp.net with jquery.

I hope you will find this article helpful to get rid of this nasty error.
Read more...

Charts and graphs using jquery and charting library the HighCharts

In this jquery tutorial you will learn how to develop charts and graphs for your website using jquery and charting library the HighCharts. It doesn't matter in which programming language you are developing your website; using Highcharts it's very easy to add interactive charts to your website. Following is the screen shot of the Chart that we will learn to implement. You can develop any sort of chart and graph depend upon your requirements, it doesn't matter how complex the chart or graph you want to develop, using Highcharts every complex chart is easy to develop :-)


Charts and graphs using jquery and charting library the HighCharts

Why HighCharts?


1) Highcharts is cross browser compatible. Even supported in Iphone/Ipad.


2) Easy to integrate.


3) Easy to use.


4) It's free for non commercial use.


5) Highcharts is solely based on native browser technologies and doesn't require any client side plugins like Flash Player or Java.


6) Highcharts supports column, line, spline, area, areaspline, bar, pie and scatter chart types. Further more, you can combine any of these in one chart.


7) Simple Configuration Syntax.


8) Export and Print facility.


To know about more features, please visit www.highcharts.com.


How to develop charts and graphs using Highcharts?


As I have already told you that highcharts is very easy to use. It requires two js files to run: The highcharts.js core and either the jquery or the MooTools framework.


Now let's begin. Go to www.highcharts.com, click on Demo Gallery link and then on left side of the page you will find numerous types of charts, click anyone of them, it will lead you to a webpage in which you will see your desired chart that you want to integrate in your website. Under chart you will see the View Options button, click on that button and you will get the code that you have to copy/paste in your webpage to integrate that chart in your website. Before copy/paste that code, please add jquery file, highcharts library and a div in your webpage code. Give an id to that div because chart will be embedded in that div. Now Let's have a look over the following example.


Highcharts.html

<html>
<head>
<title>Using Highcharts to integrate charts and graphs in your webpage</title>
<script src="jquery-1.4.1.min.js" type="text/javascript"></script>
<script type="text/javascript" src="highcharts.js"></script>
<script type="text/javascript">
var chart = null;
var _MyArray = new Array(13, 25, 32);
var _MyArray2 = new Array(8, 14, 54);
$(document).ready(function () {
chart = new Highcharts.Chart({
chart: {
renderTo: 'container',
defaultSeriesType: 'column'
},
title: {
text: 'Fruit Consumption'
},
xAxis: {
categories: ['Apples', 'Oranges', 'Mangos']
},
yAxis: {
title: {
text: 'Fruit eaten'
}
},
series: [{
name: 'Haris',
data: _MyArray
},
{
name: 'Adeel',
data: _MyArray2
}]
});


$('tspan').last().remove();
});
</script>
</head>
<body>
<form id="form1">
<div id="container" style="width: 800px; height: 400px; margin: 0 auto"></div>
</form>
</body>
</html>

That's it, chart is ready to view. Now let's understand the code. First of all I include the jquery file and highcarts library. And then I copy/paste the code that I get from highcharts.com for the chart that I want to integrate in my webpage.


The code is quite simple. In first line, chart variable is declared that contains all of the settings of the chart. After that have declared two arrays containing three elements. In renderTo option I have given the id of div that is available in body section of.html page, the chart will be embedded in that div. I have also specified the width and height of the div that will become the width and height of your chart. I have declared two series, one for Haris Fakhar and one for Adeel Fakhar and passed both arrays to those series respectively.


$('tspan').last().remove(); line removes the Highcharts.com label from your webpage but I personally think the highcharts.com label should be in your webpage because all credit goes to highcharts.


As you have seen, I hard code the data in both arrays. Now let's have a look over the following example to pass dynamic data to those highcharts' arrays using ASP.NET technology.


Highcharts.aspx

<%@ Page Language="C#" AutoEventWireup="true" CodeFile="highcharts.aspx.cs" Inherits="highcharts" %>


<!DOCTYPE html PUBLIC "-//W3C//DTD XHTML 1.0 Transitional//EN" "http://www.w3.org/TR/xhtml1/DTD/xhtml1-transitional.dtd">


<html xmlns="http://www.w3.org/1999/xhtml">
<head id="Head1" runat="server">
<title>
Charts and graphs using jquery and charting library the HighCharts
</title>
<script src="jquery-1.4.1.min.js" type="text/javascript"></script>
<script type="text/javascript" src="highcharts.js"></script>
</head>
<body>


<form id="form1" runat="server">
<script type="text/javascript" language="javascript">
var firstSeries='<%=seriesOne %>';
var secondSeries='<%=seriesTwo %>';


//debugger;

var seriesOne = new Array();
seriesOne= firstSeries.split(',');
for(var i=0;i<seriesOne.length;i++)
{
seriesOne[i]= parseInt(seriesOne[i]);
}
var seriesTwo = new Array();
seriesTwo= secondSeries.split(',');
for(var i=0;i<seriesTwo.length;i++)
{
seriesTwo[i]= parseInt(seriesTwo[i]);
}
var chart = null;
var _MyArray = seriesOne;
var _MyArray2 = seriesTwo;
var _Series1='Haris Fakhar';
var _Series2='Adeel Fakhar';

$(document).ready(function ()
{
chart = new Highcharts.Chart({
chart: {
renderTo: 'container',
defaultSeriesType: 'column'
},
title: {
text: 'Fruit Consumption'
},
xAxis: {
categories: ['Apples', 'Oranges', 'Mangos']
},
yAxis: {
title: {
text: 'Fruit eaten'
}
},
series: [{
name: _Series1,
data: _MyArray
},
{
name: _Series2,
data: _MyArray2
}]


});
$('tspan').last().remove();
});
</script>
<div id="container" style="width: 800px; height: 400px; margin: 0 auto">
</div>
</form>
</body>
</html>


Highcharts.aspx.cs

using System;
using System.Collections;
using System.Configuration;
using System.Data;
using System.Web;
using System.Web.Security;
using System.Web.UI;
using System.Web.UI.HtmlControls;
using System.Web.UI.WebControls;
using System.Web.UI.WebControls.WebParts;


public partial class highcharts : System.Web.UI.Page
{
string[] strSplitArr = new string[3];
string[] strSplitArr2 = new string[3];
protected string seriesOne { get; set; }
protected string seriesTwo { get; set; }


protected void Page_Load(object sender, EventArgs e)
{
//Assigning values to first Array
strSplitArr[0] = "13";
strSplitArr[1] = "25";
strSplitArr[2] = "32";
//Assigning values to second Array
strSplitArr2[0] = "8";
strSplitArr2[1] = "14";
strSplitArr2[2] = "54";


//Assigning comma splitted array values to the seriesOne variable
foreach (string arrStr in strSplitArr)
{
seriesOne = seriesOne + arrStr + ",";
}
//Assigning comma splitted array values to the seriesTwo variable
foreach (string arrStr in strSplitArr2)
{
seriesTwo = seriesTwo + arrStr + ",";
}


seriesOne = seriesOne.Remove(seriesOne.Length - 1);
seriesTwo = seriesTwo.Remove(seriesTwo.Length - 1);


}


}


Let's start with .cs code behind file. I have declared two arrays that will contain three elements each and then declared two protected type string variables with get;set; properties. After that I am assigning values to the arrays' elements and then applying the foreach loop to get the values of both arrays' elements and store them respectively in seriesOne and seriesTwo variables.


Now seriesOne variable have the data of strSplitArr Array in comma splitted form like 8,14,32 and seriesTwo contains the data of strSplitArr2 Array in this format 8,14,54. I could also directly assign the values to the seriesOne and seriesTwo variables without using and populating any array, the reason why I used this indirect process is only I want to tell you that if you want to get data from database then you have to use the Array or List, get all the elements of array and stored in variable just like I did.


Now seriesOne and seriesTwo both variables are ready to get in .aspx side. So it's time to discuss the code written in .aspx side.


var firstSeries='<%=seriesOne %>';
var secondSeries='<%=seriesTwo %>';


I have declared two variables firstSeries, secondSeries and then assigning both of them the values of server side seriesOne and seriesTwo string variables. Now firstseries variable have data in this format 13, 25, 32 and secondSeries variable have data in this format 8, 14, 54.


As you all know highcharts accept data in the form of array, so I have to create an array first and the following lines do exactly what I require.


var seriesOne = new Array();


seriesOne= firstSeries.split(',');


And then I am using the built-in function of javascript, the Split function to split the seriesOne variable with comma (,) seprator and assign all the comma splitted values to the seriesOne array and hence seriesOne array is dynamically populated.


for(var i=0;i<seriesOne.length;i++)
{
seriesOne[i]= parseInt(seriesOne[i]);
}


Now what is this extra loop? I know this question arises in your mind. The reason why I applied this extra loop is to parse the values of array's elements into integer from string. Split function always perform over string because where any character comes there string becomes and in our case the character used rapidly is comma (,). So after performing splitting process and dynamically populating the seriesOne array, we have data in seriesOne array in the format mentioned in following line


seriesOne=["13","25","32"]


The above data format is not acceptable by highcharts as it contains double quotes ", so we have to remove the double quotes that's why I applied for loop in seriesOne array and parse all its elements' values into integer from string data type. Same process I have done for seriesTwo array and then assign both of these arrays to highcharts as mentioned in following code snippet.


var _MyArray = seriesOne;
var _MyArray2 = seriesTwo;


series: [{
name: _Series1,
data: _MyArray
},
{
name: _Series2,
data: _MyArray2
}]


So this is all about charts and graphs using jquery and charting library Highcharts. I hope you have found this tutorial interesting.
Read more...

3-Tier Architecture in asp.net using c#

In this asp.net tutorial you will learn how to implement 3-tier architecture in asp.net using c#. 3-Tier architecture is also called layered architecture. Some people called it n-tier architecture. Layer architectures are essentially objects and work in object oriented environment just like asp.net. 3-tier architecture is a very well known architecture in the world of software development, it doesn't matter whether you are developing web based application or desktop based, it is the best architecture to use.

3-Tier Architecture in asp.net using c#

3-Tier architecture consists of
1) UI or Presentation Layer
2) Business Access Layer or Business Logic Layer
3) Data Access Layer


Presentation Layer
Presentation layer consists of pages like .aspx or desktop based form where data is presented to users or getting input from users.


Business Logic layer or Business Access Layer
Business logic layer contains all of the business logic. Its responsibility is to validate the business rules of the component and communicating with the Data Access Layer. Business Logic Layer is the class in which we write functions that get data from Presentation Layer and send that data to database through Data Access Layer.


Data Access Layer
Data Access Layer is also the class that contains methods to enable business logic layer to connect the data and perform desired actions. These desired actions can be selecting, inserting, updating and deleting the data. DAL accepts the data from BAL and sends it to the database or DAL gets the data from the database and sends it to the business layer. In short, its responsibility is to communicate with the backend structure.


Illustration of 3-Tier Architecture with Diagram


3-Tier architecture in asp.net


The figure clearly describe about the purpose of BAL and DAL. The main advantage of 3-tier architecture is to separate the presentation layer from data access layer. You will not write any function to communicate with database in presentation layer, all the required functions for communication with database will be available in DataAcessLayer. Its mean at presentation layer you will just focus at information that you will present in front of user.


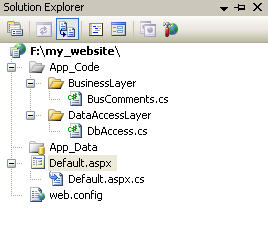
I am going to create BAL, DAL in App_Code folder. You can also create separate projects for BAL, DAL and UI (Your website) and referenced your DAL into BAL and BAL into UI. In that scenario you have to rebuild the DAL and BAL every time, in order to view the change that you have made in your BAL and DAL. So to get rid of rebuilding layers every time after change, I am going to create BAL and DAL folder in App_Code. Now feel free to make changes in BAL and DAL and just refresh the webpage to view the change that you made, in short no rebuilding of DAL and BAL is required. The following figure shows the 3-tier architecture of our website that we are going to made.


3-Tier architecture in asp.net


Design and implement 3-tier architecture

.


1) Open visual studio or visual web developer.
2) Go to File-> New Web Site


3) Select ASP.NET Web Site and then browse the Folder in which you want to save your web pages.


4) Go to Solution Explorer and then right click on your website folder. Go to Add ASP.NET Folder-> App_Code.


5) Now right click on App_Code Folder and select New Folder.


6) Create Two Folders and give BusinessLayer and DataAccessLayer names to them.
7) Now right click on DataAccessLayer -> Add New Item.


8) Select Class as template and give DbAccess name to that class.


9) Now right click on BusinessLayer folder-> Add New Item


10) Select Class as template and give BusComments.cs name to that class.


Now open your DbAccess.cs file placed in DataAccessLayer folder. Clear it by deleting all its built-in code and then copy/paste the following code in your DbAccess.cs file and then save it


DbAccess.cs

using System;
using System.Data;
using System.Collections;
using System.Collections.Generic;
using System.Configuration;
using System.Data.SqlClient;
using System.Web;


namespace DataAccessLayer
{
/// <summary>
/// Constains overloaded method to access database and run queries
/// </summary>
public class DbAccess
{
private SqlConnection DbConn = new SqlConnection();
private SqlDataAdapter DbAdapter = new SqlDataAdapter();
private SqlCommand DbCommand = new SqlCommand();
private SqlTransaction DbTran;
private string strConnString = ConfigurationManager.ConnectionStrings["WebsiteConnectionString"].ToString();


public void setConnString(string strConn)
{
try
{
strConnString = strConn;
}
catch (Exception exp)
{
throw exp;
}
}


public string getConnString()
{
try
{
return strConnString;
}
catch (Exception exp)
{
throw exp;
}
}


private void createConn()
{
try
{


DbConn.ConnectionString = strConnString;
DbConn.Open();


}
catch (Exception exp)
{
throw exp;
}
}
public void closeConnection()
{
try
{
if (DbConn.State != 0)
DbConn.Close();
}
catch (Exception exp)
{
throw exp;
}
}


public void beginTrans()
{
try
{
if (DbTran == null)
{
if (DbConn.State == 0)
{
createConn();
}


DbTran = DbConn.BeginTransaction();
DbCommand.Transaction = DbTran;
DbAdapter.SelectCommand.Transaction = DbTran;
DbAdapter.InsertCommand.Transaction = DbTran;
DbAdapter.UpdateCommand.Transaction = DbTran;
DbAdapter.DeleteCommand.Transaction = DbTran;


}


}
catch (Exception exp)
{
throw exp;
}
}
public void commitTrans()
{
try
{
if (DbTran != null)
{
DbTran.Commit();
DbTran = null;
}


}
catch (Exception exp)
{
throw exp;
}
}
public void rollbackTrans()
{
try
{
if (DbTran != null)
{
DbTran.Rollback();
DbTran = null;
}


}
catch (Exception exp)
{
throw exp;
}
}


/// <summary>
/// Fills the Dataset dset and its Table tblname via stored procedure provided as spName arguement.Takes Parameters as param
/// </summary>
/// <param name="dSet"></param>
/// <param name="spName"></param>
/// <param name="param"></param>
/// <param name="tblName"></param>
public void selectStoredProcedure(DataSet dSet, string spName, Hashtable param, string tblName)
{
try
{
if (DbConn.State == 0)
{
createConn();
}
DbCommand.Connection = DbConn;
DbCommand.CommandText = spName;
DbCommand.CommandType = CommandType.StoredProcedure;
foreach (string para in param.Keys)
{
DbCommand.Parameters.AddWithValue(para, param[para]);


}


DbAdapter.SelectCommand = (DbCommand);
DbAdapter.Fill(dSet, tblName);
}
catch (Exception exp)
{


throw exp;
}
}


public void selectStoredProcedure(DataSet dSet, string spName, string tblName)
{
try
{
if (DbConn.State == 0)
{
createConn();
}
DbCommand.Connection = DbConn;
DbCommand.CommandText = spName;
DbCommand.CommandType = CommandType.StoredProcedure;
DbAdapter.SelectCommand = DbCommand;
DbAdapter.Fill(dSet, tblName);
}
catch (Exception exp)
{
throw exp;
}
}


public void selectQuery(DataSet dSet, string query, string tblName)
{
try
{
if (DbConn.State == 0)
{
createConn();
}
DbCommand.CommandTimeout = 600;
DbCommand.Connection = DbConn;
DbCommand.CommandText = query;
DbCommand.CommandType = CommandType.Text;
DbAdapter = new SqlDataAdapter(DbCommand);
DbAdapter.Fill(dSet, tblName);
}
catch (Exception exp)
{
DbAdapter.Dispose();
DbConn.Close();
throw exp;
}
finally
{
DbAdapter.Dispose();
DbConn.Close();
}
}


public int executeQuery(string query)
{
try
{


if (DbConn.State == 0)
{
createConn();
}
DbCommand.Connection = DbConn;
DbCommand.CommandText = query;
DbCommand.CommandType = CommandType.Text;
return DbCommand.ExecuteNonQuery();
}
catch (Exception exp)
{
throw exp;
}
finally
{
DbAdapter.Dispose();
DbConn.Close();
}
}
public int executeStoredProcedure(string spName, Hashtable param)
{
try
{
if (DbConn.State == 0)
{
createConn();
}
DbCommand.Connection = DbConn;
DbCommand.CommandText = spName;
DbCommand.CommandType = CommandType.StoredProcedure;
foreach (string para in param.Keys)
{
DbCommand.Parameters.AddWithValue(para, param[para]);
}
return DbCommand.ExecuteNonQuery();
}
catch (Exception exp)
{
throw exp;
}
}
public int returnint32(string strSql)
{
try
{
if (DbConn.State == 0)
{


createConn();
}
else
{
DbConn.Close();
createConn();
}
DbCommand.Connection = DbConn;
DbCommand.CommandText = strSql;
DbCommand.CommandType = CommandType.Text;
return (int)DbCommand.ExecuteScalar();
}
catch (Exception exp)
{
return 0;
}
}
public Int64 returnint64(string strSql)
{
try
{
if (DbConn.State == 0)
{
createConn();
}
DbCommand.Connection = DbConn;
DbCommand.CommandText = strSql;
DbCommand.CommandType = CommandType.Text;
return (Int64)DbCommand.ExecuteScalar();
}
catch (Exception exp)
{
throw exp;
}
}
public int executeDataSet(DataSet dSet, string tblName, string strSql)
{
try
{
if (DbConn.State == 0)
{
createConn();
}


DbAdapter.SelectCommand.CommandText = strSql;
DbAdapter.SelectCommand.CommandType = CommandType.Text;
SqlCommandBuilder DbCommandBuilder = new SqlCommandBuilder(DbAdapter);


return DbAdapter.Update(dSet, tblName);
}
catch (Exception exp)
{
throw exp;
}
}


public bool checkDbConnection()
{
int _flag = 0;
try
{
if (DbConn.State == ConnectionState.Open)
{
DbConn.Close();
}


DbConn.ConnectionString = getConnString();
DbConn.Open();
_flag = 1;
}
catch (Exception ex)
{
_flag = 0;
}
if (_flag == 1)
{
DbConn.Close();
_flag = 0;
return true;
}
else
{
return false;
}


}
public string GetColumnValue(string Query)
{
try
{
if (DbConn.State == 0)
{
createConn();
}
DbCommand.CommandTimeout = 120;
DbCommand.Connection = DbConn;
DbCommand.CommandType = CommandType.Text;
DbCommand.CommandText = Query;


object objResult = DbCommand.ExecuteScalar();
if (objResult == null)
{
return "";
}
if (objResult == System.DBNull.Value)
{
return "";
}
else
{
return Convert.ToString(objResult);
}
}
catch (Exception ex)
{
throw ex;
}
finally
{
DbAdapter.Dispose();
DbConn.Close();
}
}
}
}

I will not go into any detail of the code written in DbAccess.cs file but I will tell you three main things about my DbAccess.cs file


1) I have created a namespace DataAccessLayer and place the DbAccess class inside the namespace. Namespaces are a way to define the classes and other types of data into one hierarchical structure. System is the basic namespace used by every .NET page. A namespace can be created via the Namespace keyword just like I did.


2) private string strConnString = ConfigurationManager.ConnectionStrings["WebsiteConnectionString"].ToString() contains the name of the connection string(WebsiteConnectionString) that I declared in web.config file.


3) DbAccess class contains all the methods to communicate with database via query and store procedures. It contains all the methods for you to perform the select, insert, update and delete the data.


Now open your BusComments.cs file and clear it by deleting all the built-in code and then copy/paste the below mention code in it.


BusComments.cs

using System;
using System.Collections.Generic;
using System.Linq;
using System.Text;
using System.Data;
using DataAccessLayer;


namespace BusinessLayer
{
public class BusComments
{
DbAccess _dbAccess = new DbAccess();
private DataSet _CommentsDS = new DataSet();
public DataSet CommentsDS
{
get
{
return _CommentsDS;
}
set
{
_CommentsDS = value;
}
}


public void getComments()
{
try
{
string strSQL = "SELECT * from comments";
//Creating Datatable, if datatable not exist already.
//The data return by query will be stored in DataTable.
if (_CommentsDS.Tables.Contains("GetComments"))
{
_CommentsDS.Tables.Remove("GetComments");
}


_dbAccess.selectQuery(_CommentsDS, strSQL, "GetComments");


}
catch (Exception ex)
{
throw ex;
}
}
}
}

Same as DbAccess.cs, I have created a namespace BusinessLayer and put BusComments class in it. I have declared a private dataset _CommentsDS and define a public dataset _CommentsDS in BusComments class. After interacting with database, Private Dataset will return all the data to the public dataset so that data can be accessible to the Presentation Layer. You may notice that I have used the DataAccessLayer namespace with other namespaces. I have also created the object of DbAccess class to get the appropriate methods written inside it to communicate with database; it’s all possible due to the inclusion of DataAccessLayer namespace. So don’t forget to include DataAccessLayer namespace in your every business layer class.


Now open the Default.aspx file and again clear all the pre written code in it and then copy/paste the following code in it.


Default.aspx

<%@ Page Language="C#" AutoEventWireup="true" CodeFile="Default.aspx.cs" Inherits="Default" %>


<!DOCTYPE html PUBLIC "-//W3C//DTD XHTML 1.0 Transitional//EN" "http://www.w3.org/TR/xhtml1/DTD/xhtml1-transitional.dtd">
<html xmlns="http://www.w3.org/1999/xhtml">
<head runat="server">
<title>Designing and implementing the 3-tier architecture in asp.net</title>
<style type="text/css">
.textDIV
{
font-family: Verdana;
font-size: 12px;
}
</style>
</head>
<body>
<form id="form1" runat="server">
<div class="textDIV">
<table width="100%" border="0" cellpadding="0" cellspacing="0" align="center">
<tr>
<td style="width: 45%">


</td>
<td>


</td>
<td>


</td>
</tr>
<tr>
<td width="20%" colspan="3" align="center">
<span style="display: inline;"><strong>Comments</strong></span>
</td>
</tr>
<tr>
<td width="20%" colspan="3">


</td>
</tr>
<tr>
<td colspan="3" align="center">
<hr style="width: 50%;" />
</td>
</tr>
<tr>
<td>


</td>
</tr>
<tr>
<td align="center" width="100%">
<asp:GridView ID="GridView1" runat="server" EnableTheming="false" AutoGenerateColumns="false"
GridLines="None" OnRowDataBound="GridView1_RowDataBound" Width="660px" HorizontalAlign="Center">
<Columns>
<asp:TemplateField HeaderText="Sr No" HeaderStyle-Width="15%" HeaderStyle-HorizontalAlign="Center">
<ItemTemplate>
<%# Container.DataItemIndex + 1 %>
</ItemTemplate>
<ItemStyle HorizontalAlign="Center" />
</asp:TemplateField>
<asp:TemplateField HeaderText="First Name" HeaderStyle-Width="15%" HeaderStyle-HorizontalAlign="Left">
<ItemTemplate>
<asp:Label ID="lblFirstName" runat="server" EnableTheming="false" Text='<%# Bind("first_name")%>'></asp:Label>
</ItemTemplate>
<ItemStyle HorizontalAlign="Left" />
</asp:TemplateField>
<asp:TemplateField HeaderText="Last Name" HeaderStyle-Width="15%" HeaderStyle-HorizontalAlign="Left">
<ItemTemplate>
<asp:Label ID="lblLastName" runat="server" EnableTheming="false" Text='<%# Bind("last_name")%>'></asp:Label>
</ItemTemplate>
<ItemStyle HorizontalAlign="Left" />
</asp:TemplateField>
<asp:TemplateField HeaderText="Comments" HeaderStyle-Width="50%" HeaderStyle-HorizontalAlign="Left">
<ItemTemplate>
<asp:Label ID="lblComments" runat="server" EnableTheming="false" Text='<%# Bind("comments")%>'></asp:Label>
</ItemTemplate>
<ItemStyle HorizontalAlign="Left" />
</asp:TemplateField>
</Columns>
</asp:GridView>
</td>
</tr>
<tr>
<td>


</td>
</tr>
<tr>
<td align="center">
<input type="button" value="Back" onclick="history.back(-1);" />
</td>
</tr>
</table>
</div>
</form>
</body>
</html>

As you have seen that in .aspx file I just placed the asp:GridView control. Now let's have a look over the Default.aspx.cs file


Default.aspx.cs

using System;
using System.Collections;
using System.Configuration;
using System.Data;
using System.Linq;
using System.Web;
using System.Web.Security;
using System.Web.UI;
using System.Web.UI.HtmlControls;
using System.Web.UI.WebControls;
using System.Web.UI.WebControls.WebParts;
using System.Xml.Linq;
using BusinessLayer;


public partial class Default : System.Web.UI.Page
{
BusComments _objComments = new BusComments();
protected void Page_Load(object sender, EventArgs e)
{
if (!Page.IsPostBack)
{
BindGrid();
}
}


public void BindGrid()
{
_objComments.getComments();
//Tables[“GetComments”] is the DataTable that we have created in BusComments class
GridView1.DataSource = _objComments.CommentsDS.Tables["GetComments"];
GridView1.DataBind();
}


protected void GridView1_RowDataBound(object sender, GridViewRowEventArgs e)
{
if (e.Row.RowType == DataControlRowType.DataRow)
{
((Label)e.Row.FindControl("lblComments")).Text = ((Label)e.Row.FindControl("lblComments")).Text.ToString().ToUpper();
}


}
}

I have included the BusinessLayer namespace on the top so that I can get access to the BusComments class. Then I initialized the object of BusComments class and then by using the object I have called my required function placed in BusComments class to get data and populate the GridView. Now you have seen I called the function written in BusComments class to get the data from database and that function actually called its required function written in DbAccess class to get the data from database. DbAccess gets the data from database and return to BusComments Class, BusComments class gets the data from DbAccess class and return to Presentation Layer which is default.aspx

Update Note at May-01-2011
I have seen through tracking software that this post is very much popular among my respected users. So i have decided to write further posts on this topic, such as how to insert, delete, update records in database using 3-tier architecture. So keep in touch with nice-tutorials:)


Update Note at May-05-2011
Just now i have written post on Insertion of records in database using 3-tier architecture in asp.net with c#. More to come soon on this topic. Keep in touch.


Update Note at June-01-2011
Just now i have written post on Delete records in database using 3-tier architecture in asp.net with c#. More to come soon on this topic. Stay tune :)


Update Note at August-09-2011
Sorry for the delay. Just now i have written post on Update records in database using 3-tier architecture in asp.net with c#. Stay tuned. This topic is not over yet. Soon i will write posts for jquery and 3-tier architecture in asp.net with c#. Jquery will boost the performance of your website, boost up the speed of your website and also make your website light. :)


So this is the way to design and implement the 3-tier architecture/layered architecture/n-tier architecture in asp.net using c#.
Read more...

Send attachment with email in asp.net using c#

In this asp.net tutorial you will learn how to send attachment with email in asp.net using c#. As far as attachment with email is concerned, you have to first upload the file to any folder in your web server and then using that path you can send attachment with email.


So it's crystal clear that you have to first upload the file to the web server.
I have already written a detail tutorial about file uploading in asp.net using c#.


If you don't know how to upload file then please refer to that tutorial.

Send attachment with email in asp.net using c#


Once you have successfully uploaded the attachment file to the web server then add the code snippet of line# 79 and 80 in your c# source code, also you have to copy/paste the sendEmail() function in your c# code.

Upload_single_file.aspx.cs

using System;
using System.Collections;
using System.Configuration;
using System.Data;
using System.Linq;
using System.Web;
using System.Web.Security;
using System.Web.UI;
using System.Web.UI.HtmlControls;
using System.Web.UI.WebControls;//Used for file uploading
using System.Web.UI.WebControls.WebParts;
using System.Net; //Use for sending Emails
using System.Net.Mail;//Use for sending Emails


public partial class Upload_single_file : System.Web.UI.Page
{
//global variable that will contain the path of the uploaded file

string _uploadedFilePath = "";


protected void Page_Load(object sender, EventArgs e)
{
}


//Function to upload the file
protected void btnUpload_Click(object sender, EventArgs e)
{


//Checking whether asp file upload control (txtFile in my case) contains any file or not


//If it contains file
if (txtFile.HasFile)
{
//Getting file name
string fileName = txtFile.FileName.ToString();


//Creating array that will contain the data before and after period (.)
string[] dots = fileName.Split('.');


string fileType = "pdf,doc,xls";
//type = dots[2 - 1] // type=dots[1] which contains your file extension


string type = dots[dots.Length - 1];
//If uploaded file is not in above mentioned formats format then this set of code will be //executed
if (fileType.IndexOf(type) == -1)
{
//In my case, I have put a asp:label in .aspx page to show message.
lblMessage.Visible=true;
lblMessage.Text = "Please only upload files that end in types: \n\n" + (fileType) + "\n\nPlease select a new file and try again.";
txtFile.Focus();
return;
}
else
{


string strUploadPath = "", strFilePath = "";


//Replace your folder Name with this Uploaded Folder Name
strFilePath = @"~\uploaded Folder Name\";


//Current Date Time is appending with the File Name to track when the file
//is uploaded


string path = DateTime.Now.Month.ToString() + DateTime.Now.Day.ToString() + DateTime.Now.Year.ToString() + DateTime.Now.Hour.ToString() + DateTime.Now.Minute.ToString() + DateTime.Now.Hour.ToString() + DateTime.Now.Millisecond.ToString();
strUploadPath = Server.MapPath(strFilePath) + path + txtFile.FileName.ToString().Replace("'", "");
txtFile.SaveAs(strUploadPath.ToString());
uploadedFilePath=strUploadPath;
sendEmail();


lblMessage.Visible=true;


lblMessage.Text = "Email Sent Successfully";


}
}
public void sendEmail()
{
MailMessage msg = new MailMessage("fromemailaddress@somedomain.com","toemailaddress@somedomain.com");
msg.Subject = "Subject of email will come here";
msg.Body = Bodytext();
msg.IsBodyHtml = true;
msg.Attachments.Add(new Attachment(_uploadedFilePath));
SmtpClient smtpclient = new SmtpClient();
try
{
smtpclient.Send(msg);
}
catch (Exception ex)
{
throw ex;
}
}


}

You have seen that using the Attachments property of Mail class, I have attached the uploaded file by passing the global variable _uploadedFilePath that contains the path of the uploaded file and then finally I have send email using the Send() method of the SmtpMail Class.


If you want to delete the attachment file after email sent successfully then you will have to write the following code snippet after the calling of sendEmail() function.


/* Delete the attachements if any */
if (_uploadedFilePath != null)
File.Delete(Server.MapPath(_uploadedFilePath));

Note: - Please check mail settings in your web.config file. Please don't forget to declare the System.Net and System.Net.Mail namespaces if you want to send email.


So this is the proper way to send attachment with email in asp.net using c#. Later on I will teach you how to send multiple attachments with email in asp.net using c#. I also intend to write a tutorial about file uploading using silverlight that will also show a progress bar when file is being uploaded.
Read more...

CS0501:'blah blah' must declare a body because it is not marked abstract or extern

In this asp.net tutorial you will find the solution of CS0501 error which is CS0501:'blah blah' must declare a body because it is not marked abstract or extern. I got this error when I download an aspx page from some website and after some modification in c# code when I run my .aspx page then i got the error mentioned in following screenshot.


As you have seen, screenshot shows there is something wrong with the protected string country {get;set;}. Actually i decalred the protected type string variable country in .cs code behind file and after assigning some value to it i tried to get the variable on .aspx side using the following code snippet


my_page.aspx

<script language="javascript" type="text/javascript">
var country='<%=country %>';
</script>

and then I got this CS0501 error. So after performing some search, I got its solution. And solution is you have to add following compiler settings in your web.config file.

CS0501:'blah blah' must declare a body because it is not marked abstract or extern solution


<system.codedom>
<compilers>
<compiler compileroptions="/warnaserror-" extension=".cs" language="c#;cs;csharp" type="Microsoft.CSharp.CSharpCodeProvider, System, Version=2.0.0.0, Culture=neutral, PublicKeyToken=b77a5c561934e089" warninglevel="4">
<provideroption name="CompilerVersion" value="v3.5">
</compiler>
<compiler compileroptions="/optioninfer+" extension=".vb" language="vb;vbs;visualbasic;vbscript" type="Microsoft.VisualBasic.VBCodeProvider, System, Version=2.0.0.0, Culture=neutral, PublicKeyToken=b77a5c561934e089">
<provideroption name="CompilerVersion" value="v3.5">
</compiler>
</compilers>
</system.codedom>

Note:- These settings based on the version of .Net Framework you installed in your system.


So this is the solution of CS0501:'blah blah' must declare a body because it is not marked abstract or extern. If you have some more solutions then don't hesitate to share.
Read more...

Learn how to generate the unique string using GUID method in asp.net using c#

in this asp.net tutorial you will learn how to generate the unique string using GUID feature in asp.net. GUID stands for Global unique identifier. GUID is a 128 bit integer that can be used to uniquely identify any thing in database. It can help you like a primary key in your database table. There is no chance of duplication of GUID in your database table. So if you want to use GUID as a primary key then go ahead and use it as a primary key without any hesitation.
I have seen many programmers who use the combination of current date time, random number and some string to make the unique string and then store it in database table to uniquely identify the records. Using GUID you will not go with such hassle.

How to create a GUID in asp.net using c#

You can find the GUID method in the system namespace. The GUID method System.Guid.NewGuid() initializes a new instance of GUID class.


There are also some overloads available for those programmers who want to format the GUID in a particular fashion.


Let's have a look over code below to learn the use of GUID method.

Generating the unique string using GUID method in asp.net using c#

string unique_string =Guid.NewGuid().ToString();

Use these overloads method to format the GUID string.

Guid.NewGuid().ToString("N");
Guid.NewGuid().ToString("D");
Guid.NewGuid().ToString("B");
Guid.NewGuid().ToString("P");

There is also a data type uniqueidentifier in sql server to store the GUID value. If you don't want to use this GUID value through c# then you can use NEWID() fucntion of sql server.


GUID is Everywhere


In windows environment GUID is used everywhere. Open the registry by executing the regedit command in run on your windows system, you can easily see that GUIDs are used extensively to uniquely identify every application, they serve like application IDS under the HKEY_CLASSES_ROOT section (AppID key).


Typical format of GUID


936DA01F-9ABD-4d9d-80C7-02AF85C822A8


So this is the way to generate the unique string using GUID method in asp.net using c#.
Read more...

Limit the text length in textbox using javascript

Sometimes you may get requirement to limit the text length in textbox using javascript. It is better approach to limit the text length in textbox because during development you must think that people can harm your whole database by entering the malicious text of thousands of characters if you don’t have applied any text limit in your input textbox or asp:textbox. If malicious text of thousands of characters is provided through textbox then two things can happen


1) Page will show an error after getting respond from database because the column of the table that will store the data might be have width of 100 characters.

2) Incase user enters the script code of thousands of characters then your website may be down or can have other related problem


So bottom line is ALWAYS LIMIT THE TEXT LENGTH IN TEXTBOX. In this tutorial I am covering this topic using javascript the client side language but later on in this blog you will find how to achieve same thing using asp.net the server side because javascript might be disable in user’s/hacker’s system. I write user’s because I believe user can also harm your database unintentionally if you have not taken any precautions.

Now let's have a look over how to apply limit to the text length in textbox either it is Singleline or Multiline.

Limit the text length in textbox using javascript


<html>
<head>
<title>
Limit the text length in textbox using javascript
</title>
<script language="javascript" type="text/javascript">
function checkLength(textboxID)
{
var maxLen; // max number of characters allowed
if(textboxID=="txtFirstName")
{
maxLen=20;
}
else if(textboxID=="txtLastName")
{
maxLen=30;
}
else
{
maxLen = 100;
}


var getValue;
getValue = document.getElementById(textboxID).value;
if (getValue.length > maxLen)
{
document.getElementById(textboxID).value = document.getElementById(textboxID).value.substring(0, maxLen);
}
}
</script>
</head>
<body>
<form>
<input type="text" id="txtFirstName" name="txtFirstName" onkeydown="checkLength(this.id);" onblur="checkLength(this.id);" /><br/><br/>
<input type="text" id="txtLastName" name="txtLastName" onkeydown="checkLength(this.id);" onblur="checkLength(this.id);" /><br/><br/>
<textarea id="txtDescription" rows="10" cols="10" onkeydown="checkLength(this.id);" onblur="checkLength(this.id);">
</textarea>
</form>
</body>
</html>

I could apply the text limit in textbox without using any single line code of javascript by using maxlength property of textbox like given below


<input type="text" id="txtDescription" name="txtDescription" maxlength="2"/>


The maxlength attribute of textbox works fine when textbox is in singleline mode but what about if textbox is in multiline mode? If textbox is multiline (i;e; <textarea> in html) then you have to use the above mentioned javascript custom function and have to call that function using onkeydown and onblur event of multiline textbox.


For asp:Textbox

<script language="javascript" type="text/javascript">
function checkLength(textboxID)
{
var maxLen; // max number of characters allowed
if(textboxID=="txtFirstName")
{
maxLen=20;
}
else if(textboxID=="txtLastName")
{
maxLen=30;
}
else
{
maxLen = 100;
}


var getValue;
getValue = document.getElementById(textboxID).value;
if (getValue.length > maxLen)
{
document.getElementById(textboxID).value = document.getElementById(textboxID).value.substring(0, maxLen);
}
}
</script>


<asp:TextBox ID="txtFirstName" runat="server" EnableTheming="false" Width="200px" onkeydown="checkLength(this.id);" onblur="checkLength(this.id);"></asp:TextBox><br/><br/>


<asp:TextBox ID="txtLastName" runat="server" EnableTheming="false" Width="200px" onkeydown="checkLength(this.id);" onblur="checkLength(this.id);"></asp:TextBox><br/><br/>


<asp:TextBox ID="txtDescription" runat="server" TextMode="MultiLine" Width="400px" EnableTheming="false"
Rows="5" cols="8" onkeydown="checkLength(this.id);" onblur="checkLength(this.id);"></asp:TextBox>

I have used onblur event because I know many hackers can use copy/paste to enter malicious text of thousands of characters and onblur() event will be proved as a safeguard on that scenario.


So this is the way to limit the text length in textbox using javascript.
Read more...

Disabling cut, copy, paste, right click and context menu in a textbox on aspx page

In this tutorial you will learn how to disable cut, copy, paste, right click and context menu in asp:textbox. Sometimes due to security point of view you may want to do this. It's quite simple, I often see that developers write javascript code to disable the cut, copy, paste in textbox either textbox is input or server side asp:textbox.


I will not use any single line of javascript code to achieve what I want. Now let's have a look over how to do so.

Disabling cut, copy, paste, right click and context menu in a textbox


<asp:TextBox ID="txtName" runat="server" oncopy="return false" onpaste="return false" oncut="return false" oncontextmenu="return false">
</asp:TextBox>
You can use same concept with input textbox like

<input type="text" ID="txtName" oncopy="return false" onpaste="return false" oncut="return false" oncontextmenu="return false"/>

to disable the copy, paste, cut, right click and contextmenu in textbox.
I have used the events (oncopy, onpaste, oncut, oncontextmenu) of textbox to achieve the desired disability.

If you want to show the alerts then you have to modify the code like this

<input type="text" ID="txtName" oncopy="disableCopy();" onpaste="disablePaste();" oncut="disableCut();" oncontextmenu="disableContextMenu();"/>


<script language="javascript" type="text/javascript">
function disableCopy()
{
alert("You cannot perform Copy");
return false;
}


function disablePaste()
{
alert("You cannot perform Paste");
return false;
}


function disableCut()
{
alert("You cannot perform Cut");
return false;
}


function disableContextMenu()
{
alert("You cannot perform right click via mouse as well as keyboard");
return false;
}
</script>

I hope you will find this article very interesting.
Happy Coding Keep Coding
Read more...

How to highlight the selected row in table/gridview using jquery

In this jquery tutorial you will learn how to highlight the selected row in table/gridview using jquery. I am selecting the rows on the basis of checked checkboxes. Whenever checkbox is checked then its row will be highlighted.


I have already written a tutorial about how to check/uncheck all checkboxes using jquery.


So I will continue from there and merge the code to highlight the selected row with the code to check/uncheck all checkboxes using jquery.


Now let's have a look over welcome.html

How to highlight the selected row in table/gridview using jquery


<html>
<head>
<title> How to highlight the selected row in table/gridview using jquery</title>
<script src="http://ajax.googleapis.com/ajax/libs/jquery/1.4.2/jquery.min.js" type="text/javascript"
charset="utf-8"></script>
<script language="javascript" type="text/javascript">
$(document).ready(function()
{
$("#checkall").live('click',function(event){
$('input:checkbox:not(#checkall)').attr('checked',this.checked);
//To Highlight
if ($(this).attr("checked") == true)
{
//$(this).parents('table:eq(0)').find('tr:not(#chkrow)').css("background-color","#FF3700");
$("#tblDisplay").find('tr:not(#chkrow)').css("background-color","#FC9A01");
}
else
{
//$(this).parents('table:eq(0)').find('tr:not(#chkrow)').css("background-color","#fff");
$("#tblDisplay").find('tr:not(#chkrow)').css("background-color","#FFF");
}
});
$('input:checkbox:not(#checkall)').live('click',function(event)
{
if($("#checkall").attr('checked') == true && this.checked == false)
{
$("#checkall").attr('checked',false);
$(this).closest('tr').css("background-color","#ffffff");
}
if(this.checked == true)
{
$(this).closest('tr').css("background-color","#FC9A01");
CheckSelectAll();
}
if(this.checked == false)
{
$(this).closest('tr').css("background-color","#ffffff");
}
});

function CheckSelectAll()
{
var flag = true;
$('input:checkbox:not(#checkall)').each(function() {
if(this.checked == false)
flag = false;
});
$("#checkall").attr('checked',flag);
}
});

</script>
</head>
<body>
<table width="50%" cellspacing="0" border="0" align="left" id="tblDisplay" cellpading="0"
style="font-family: verdana; font-size: 10px;">
<thead>
<tr id="chkrow">
<th>
<input type="checkbox" id="checkall" />
</th>
<th>
Sr.
</th>
<th style="text-align: left;">
First Name
</th>
<th style="text-align: left;">
Last Name
</th>
<th>
Country
</th>
<th>
Marital Status
</th>
</tr>
</thead>
<tbody>
<tr>
<td style="text-align: center;">
<input type="checkbox" value="1" />
</td>
<td style="text-align: center;">
1
</td>
<td style="text-align: left;">
Adeel
</td>
<td style="text-align: left;">
Fakhar
</td>
<td style="text-align: center;">
Pakistan
</td>
<td style="text-align: center;">
Single
</td>
</tr>
<tr>
<td style="text-align: center;">
<input type="checkbox" value="2" />
</td>
<td style="text-align: center;">
2
</td>
<td style="text-align: left;">
Omer
</td>
<td style="text-align: left;">
Fakhar
</td>
<td style="text-align: center;">
Pakistan
</td>
<td style="text-align: center;">
Single
</td>
</tr>
<tr>
<td style="text-align: center;">
<input type="checkbox" value="3" />
</td>
<td style="text-align: center;">
3
</td>
<td style="text-align: left;">
Umer
</td>
<td style="text-align: left;">
Mukhtar
</td>
<td style="text-align: center;">
Pakistan
</td>
<td style="text-align: center;">
Single
</td>
</tr>
<tr>
<td style="text-align: center;">
<input type="checkbox" value="4" />
</td>
<td style="text-align: center;">
4
</td>
<td style="text-align: left;">
Mark
</td>
<td style="text-align: left;">
Waugh
</td>
<td style="text-align: center;">
Australia
</td>
<td style="text-align: center;">
Married
</td>
</tr>
</tbody>
</table>
</body>
</html>

Note:- Using same technique you can highlight the row in gridview using jquery becuase when page is render then <asp:GridView> becomes the <table>.


Copy/paste all the code, save the page, run the page and enjoy what you want.


So I hope you will find this tutorial of jquery very handy. Happy Coding... Keep Coding.
Read more...

Check/Uncheck All Checkboxes using jquery


In this jquery tutorial you will learn how to check/uncheck all checkboxes using jquery. I have already written a post about how to check/uncheck all checkboxes using javascript and c#.


But being a software engineer, we should always follow the latest technology as well. So that's why I have written this tutorial in jquery. So let's have a look over the home.html


Check/Uncheck All Checkboxes using jquery


<html>
<head>
<title>Check/Uncheck All Checkboxes using jquery </title>


<script src="http://ajax.googleapis.com/ajax/libs/jquery/1.4.2/jquery.min.js" type="text/javascript"
charset="utf-8"></script>


<script language="javascript" type="text/javascript">
$(document).ready(function()
{
$("#checkall").live('click',function(event){
$('input:checkbox:not(#checkall)').attr('checked',this.checked);
});


$('input:checkbox:not(#checkall)').live('click',function(event)
{
if($("#checkall").attr('checked') == true && this.checked == false)
$("#checkall").attr('checked',false);
if(this.checked == true)
CheckSelectAll();
});


function CheckSelectAll()
{
var flag = true;
$('input:checkbox:not(#checkall)').each(function() {
if(this.checked == false)
flag = false;
});
$("#checkall").attr('checked',flag);
}


});


</script>


</head>
<body>
<table width="50%" cellspacing="0" border="0" align="left" id="tblDisplay" cellpading="0"
style="font-family: verdana; font-size: 10px;">
<thead>
<tr id="chkrow">
<th>
<input type="checkbox" id="checkall" />
</th>
<th>
Sr.
</th>
<th style="text-align: left;">
First Name
</th>
<th style="text-align: left;">
Last Name
</th>
<th>
Country
</th>
<th>
Marital Status
</th>
</tr>
</thead>
<tbody>
<tr>
<td style="text-align: center;">
<input type="checkbox" value="1" />
</td>
<td style="text-align: center;">
1
</td>
<td style="text-align: left;">
Adeel
</td>
<td style="text-align: left;">
Fakhar
</td>
<td style="text-align: center;">
Pakistan
</td>
<td style="text-align: center;">
Single
</td>
</tr>
<tr>
<td style="text-align: center;">
<input type="checkbox" value="2" />
</td>
<td style="text-align: center;">
2
</td>
<td style="text-align: left;">
Omer
</td>
<td style="text-align: left;">
Fakhar
</td>
<td style="text-align: center;">
Pakistan
</td>
<td style="text-align: center;">
Single
</td>
</tr>
<tr>
<td style="text-align: center;">
<input type="checkbox" value="3" />
</td>
<td style="text-align: center;">
3
</td>
<td style="text-align: left;">
Umer
</td>
<td style="text-align: left;">
Mukhtar
</td>
<td style="text-align: center;">
Pakistan
</td>
<td style="text-align: center;">
Single
</td>
</tr>
<tr>
<td style="text-align: center;">
<input type="checkbox" value="4" />
</td>
<td style="text-align: center;">
4
</td>
<td style="text-align: left;">
Mark
</td>
<td style="text-align: left;">
Waugh
</td>
<td style="text-align: center;">
Australia
</td>
<td style="text-align: center;">
Married
</td>
</tr>
</tbody>
</table>
</body>
</html>

Explaination of Code:-


I have placed a checkbox of id "checkall" in the first row, the header row of the table. Now by clicking this checkbox, the process of check/uncheck all checkboxes will be performed.


Now let's understand the jquery code.


$("#checkall").live('click',function(event){
$('input:checkbox:not(#checkall)').attr('checked',this.checked);
});

The above code snippet will performed the thing that you want to do. It will bind the click event to the "checkall" checkbox and will check/uncheck all the checkboxes other than itself.


$('input:checkbox:not(#checkall)').live('click',function(event)

The above code will bind the click event to all of the checkboxes other then the checkbox of id "checkall".


Note: - Always use the click event with live function, live function can bind the click event to the dynamic elements (the elements that are generated at runtime) as well. It will not create any problem if data is coming from database i.e.; dynamic rows are being added to the table.


If you write the same code like this

$("#checkall").click(function(){
$('input:checkbox:not(#checkall)').attr('checked',this.checked);
});

Then if you are getting the table rows from database with checkboxes then the click event will not be bind with the checkboxes of dynamic rows. So always use the click event with live function.

if($("#checkall").attr('checked') == true && this.checked == false)
$("#checkall").attr('checked',false);

Now let's consider you have checked all the checkboxes. Now this above code snippet will uncheck the header checkbox “checkall” when any of the checkbox placed in the body of the table will be unchecked. The checkbox "checkall"
should be only checked when all the other checkboxes are checked and when any one of the checkbox will be unchecked the "checkall" checkbox should be unchecked.

if(this.checked == true)
CheckSelectAll();


function CheckSelectAll()
{
var flag = true;
$('input:checkbox:not(#checkall)').each(function() {
if(this.checked == false)
flag = false;
});
$("#checkall").attr('checked',flag);
}

Now when you checked any of the checkbox placed in the <tbody> of the table then the above code snippet will check whether all the checkboxes are checked or not through built-in each() of jquery that will loop through all the checkboxes placed in the <tbody> and will try to find any of the checkbox that is unchecked, if it finds any unchecked checkbox then it will set the variable flag to false and the "checkall" checkbox(the checkbox placed in the <thead> row of the table) will be unchecked
But when it will not find any of the checkbox unchecked then it will checked the "checkall" checkbox.


Note: - It is not compulsory for you to use the <thead> and <tbody> in the <table>. I just use them to make the table structure better and understandable.


So this is the way to check/uncheck all checkboxes using jquery.
Read more...

How to get row data of html table using jquery

In this jquery tutorial you will learn how to get the row data of html table. To manipulate and filter data is now a days common task for web developers. I will present two scenarios in front of you that will cover how to get the row data of both static table and the table that is generated dynamically. let's have a look over how to do so

First Scenario:-

Getting the row data of html static table using jquery.


Let's suppose, You have static html table and you want to get the data of your desired row. For this you have to copy/paste this example.
<script src="http://ajax.googleapis.com/ajax/libs/jquery/1.4.2/jquery.min.js"
type="text/javascript" charset="utf-8"></script>

<script type="text/javascript">
$(document).ready(function()

{

$("#tblTest td:nth-child(1)").click(function(event){

//Prevent the hyperlink to perform default behavior
event.preventDefault();
//alert($(event.target).text())

var $td= $(this).closest('tr').children('td');


var sr= $td.eq(0).text();

var name= $td.eq(1).text();

var city= $td.eq(2).text();

alert(sr);

alert(name);

alert(city);
}

);

});

</script>
And then i draw html table
<table id="tblTest">
<tr>
<td>
<a href="#">1</a>
</td>
<td>
Adeel Fakhar
</td>
<td>
Pakistan
</td>
</tr>
<tr>
<td>
<a href="#">2</a>
</td>
<td>
Mark David
</td>
<td>
America
</td>
</tr>
</table>
So now, if you will click the hyperlink of first row, you will get the data of whole row. First you will get the data or inner html of table’s first cell then second and then you will get the data or inner html of table’s last cell.

But what if you want to get the row data of html table that is generated dynamically?

Second Scenario:-

Getting the row data of dynamic html table using jquery


Yeah, to get the row data of table that is generated dynamically, containing the values from database in it's cell. you have to use the jquery built-in live() function
$(document).ready(function()

{

$("table[id$='tblDisplay'] td:nth-child(1)").live('click',function(event)

{
//Prevent the hyperlink to perform default behavior
event.preventDefault();
var $td= $(this).closest('tr').children('td');
var sr= $td.eq(0).text();

var name= $td.eq(1).text();

var city=$td.eq(2).text();

alert(sr);

alert(name);

alert(city);

//$("#txtName").val(name); // assigning the name to the textbox

}

);

});
The reason why we need live() function is that it allows you to set the function to not only current elements but also future elemnents, That's why all your page elements will stay live even after you have made an ajax call.

live () function Binds a handler to an event (like click) for all current and future matched elements. It can also bind custom events.

This function is similar to the .click() but .click() will only match elements that are created via the XHTML with DOM is loaded. With that said, using .live() is very useful for dynamic websites, where you are creating and removing elements on your website

.click() function does not work on dynamically created items.

You can adopt same method to get the row data of gridview because when asp.net page renders then gridview becomes <table>.

So this is the way to get the row data of html table in jquery.

Read more...

how to embed a flash movie in asp.net masterpage

In this tutorial we will learn how to embed a flash movie in asp.net masterpage. To embed a flash movie in asp.net master page is not a rocket science but still most of developers found some problems while doing so. In this tutorial we will cover those two common problems that come while embedding a flash movie in asp.net master page. Let's read both case scenarios.

How to embed a flash movie in asp.net masterpage

Case Scenario 1
Let's suppose you have a masterpage and you have embeded the flash movie in it . Flash movie is located in let's suppose images folder that is placed on same level as of masterpage. In that scenario following code will be used to embed the flash movie in asp.net masterpage


<object classid="clsid:D27CDB6E-AE6D-11cf-96B8-444553540000" codebase="http://download.macromedia.com/pub/
shockwave/cabs/flash/swflash.cab#version=9,0,28,0"
width="925" height="300"><object classid="clsid:D27CDB6E-AE6D-11cf-96B8-444553540000" codebase="http://download.macromedia.com/pub/shockwave/
width="925" height="300">
<param name="movie" value='/images/yourflashmovie.swf' />
<param name="quality" value="high" />

<embed src='/images/yourflashmovie.swf' quality="high" pluginspage=http://www.adobe.com/shockwave/download/download.cgi?P1_Prod_Version=ShockwaveFlash type="application/x-shockwave-flash" width="925" height="300"></embed>
</object>
Note:-
version=9,0,28,0 is the version of flash player that I am using.

Now let's suppose you have welcome.aspx page also placed on same folder of .masterpage and when you will run this welcome.aspx page, you will see flash movie on welcome.aspx page but this flash movie will not come on all other .aspx pages of your website that are located in other nested folders, the hierarchy other than .masterpage. For example you will not see flash movie in your Comments/comments.aspx webpage.

Now let's understand the reason why the flash movie is not visible in http://yourwebsite.com/Comments/comments.aspx and visible in http://yourwebsite.com/Welcome.aspx. As you have embedded the flash movie in your .masterpage, now please look at the code of object tag that will embed the flash movie in masterpage. Look at the following line codes between the <object> </object> tags

<param name="movie" value='/images/yourflashmovie.swf' />


This line causes your flash movie not to visible in all the .aspx pages placed on nested folders or placed on hierarchy other than .masterpage. When you will run the webpages such as http://yourwebsite.com/Comments/comments.aspx the path of flash movie will become Comments/images/yourflashmovie.swf which is totally wrong as we don’t have any images folder inside the comments folder. Actually the page tries to find the images folder in the same hierarchy where Comments.aspx page exists and when it fails to find any images folder then obviously it will not show required flash movie in your aspx page.

Now let’s have a look over how to resolve this issue so that once you embed the flash movie in .masterpage then it will be visible to all other webpages no matter where they exist, but inheriting that masterpage. Here’s the code that will solve your problem
<object classid="clsid:D27CDB6E-AE6D-11cf-96B8-444553540000" codebase=http://download.macromedia.com/pub/shockwave/
cabs/flash/swflash.cab#version=9,0,28,0 width="925" height="300">
<param name="movie" value='<%= ResolveUrl("~/images/yourflashmovie.swf") %>' />

<param name="quality" value="high" />
<embed src='<%= ResolveUrl("~/images/yourflashmovie.swf") %>' quality="high" pluginspage=http://www.adobe.com/shockwave/download/download.cgi?P1_Prod_Version=ShockwaveFlash type="application/x-shockwave-flash" width="925" height="300">
</embed>
</object>
ResolveUrl() plays the vital role to solve your problem.

Syntax:-
C#
public string ResolveUrl(
string relativeUrl
)

Parameters:-
relativeUrl
Type: System..::.String
The URL associated with the TemplateSourceDirectory property.

Return Value
Type: System..::.String
The converted URL.

ResolveUrl() converts a URL into one that is usable on the requesting client. If the relativeUrl parameter contains an absolute URL, the unchanged URL is returned. If the relativeUrl parameter contains a relative URL, that URL is changed to a relative URL that is correct for the current request path, so that the browser can resolve the URL. This method uses the TemplateSourceDirectory property to resolve to the absolute URL. The returned URL is for client use.

Case
Scenario 2
Once I was developing a website in which I was using css dropdown menu. Now problem was that for some reason css dropdown menu appears behind the embeded flash movie. I was very upset due to that.

Now let's have a look over how I solved that issue. Simply I add wmode attribute to the <param> inside the <object></object>. Let’s have a look over the code

<object classid="clsid:D27CDB6E-AE6D-11cf-96B8-444553540000" codebase=http://download.macromedia.com/pub/shockwave/cabs/flash/swflash.cab#version=9,0,28,0 width="925" height="300">

<param name="movie" value='<%= ResolveUrl("~/images/yourflashmovie.swf") %>' />

<param name="quality" value="high" />

<param name="wmode" value="transparent" />

<embed src='<%= ResolveUrl("~/images/yourflashmovie.swf") %>' quality="high"
wmode="transparent" pluginspage=http://www.adobe.com/shockwave/download/download.cgi?P1_Prod_Version=ShockwaveFlash type="application/x-shockwave-flash" width="925" height="300"></embed>
</object>

Please add the wmode attribute inside the <embed> because incase if <object> is not executed then <embed> will be executed.

wmode attribute set the background of Flash movie to transparent. It allows the background color or image of the HTML page that contains the Flash movie to show through and allows the layering of Flash content with DHTML content. For further reference please visit How to make a flash movie with a transparent background
So these are the ways to embed a flash movie in asp.net masterpage properly to get rid of various problems.


Happy Coding!!!

Read more...